Quality Control & Efficient Fitting
Impervia flooring undergoes rigorous quality control checks during production and packaging to ensure that our product reaches you in optimum condition. The profiling machines are checked daily for the accuracy of machining, and any maintenance required is carried out directly by Homag (the machinery manufacturers).
Production batches are continually checked for ease of locking when fitting, and for any damage to the profile after finishing and before packing. This ensures that any sub-standard products are removed before they leave our factory.
Efficient Quick Installation of Impervia Flooring:
It is important to ensure that the correct tools are used during installation.
Tools required for installation:
The plastic or nylon mallet shown is the perfect tool. Do not use rubber as the shock impact is not good enough to get a solid “Click”.
The plastic or nylon mallet shown is the perfect tool. Do not use rubber as the shock impact is not good enough to get a solid “Click”.


Cutting
Use a high-quality heavy-duty Stanley knife or equivalent to score the top of the Impervia if it is a right-angled cut.
After 3 scores of the top, you then “snap” the cut. Make sure you then cut the acoustic backing as well.
If you have angles to cut, you can use this method or a jigsaw with a metal or stone cutting fine blade.
After 3 scores of the top, you then “snap” the cut. Make sure you then cut the acoustic backing as well.
If you have angles to cut, you can use this method or a jigsaw with a metal or stone cutting fine blade.
You must be careful and cut slowly with a jigsaw. Make sure you have the finest tooth blade possible for cutting metal or stone.
Other tools are a square, pencil and measuring tape.
You must be careful and cut slowly with a jigsaw. Make sure you have the finest tooth blade possible for cutting metal or stone.
Other tools are a square, pencil and measuring tape.
With Impervia, you do not need to leave any gaps around the perimeter or have transition strips for large areas. You need to apply a quick hard tap to lock the floor together properly. This will ensure you do not damage the surface. Please see our video here or scan our QR code with your phone: Installing Impervia Herringbone.
Sub Floor Preparation:
One of the great features of Impervia is that you do not need underlay when installing. All you need is a flat floor that is solid and sound. You can lay over existing tiles or wood floors if they are perfectly flat with nothing loose. Impervia has its own 1.5mm acoustic backing with a 21-decibel reading which reduces sound transmission by 75%.
Concrete floors need to be SR1 or better, and there is no need to worry about environmental conditions as Impervia is waterproof and fireproof. You can see THE DURABILITY of Impervia here.
Fitting of Planks and Herringbone Impervia.
Generally, planks are easier and quicker than fitting the herringbone as they come in wide long planks. You use the same tools and techniques for both with just one difference in the installation of herringbone products.
You can see numerous videos on our website but some useful links are below.
How to quickly install Impervia Herringbone:
The most important points to remember when installing Impervia Herringbone flooring are as follows:
Open the cartons and sort the left- and right-handed pieces into two piles.
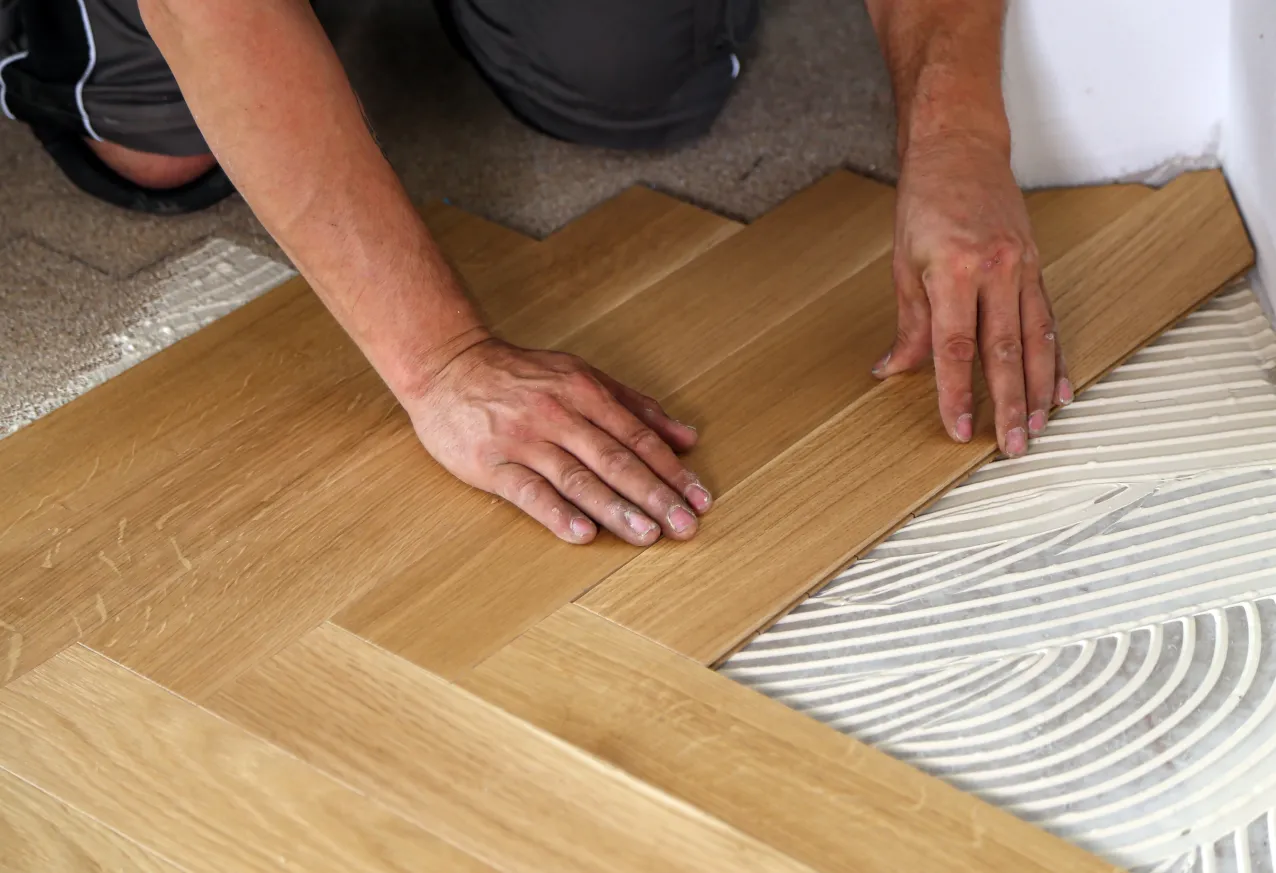
NEVER try and slide the pieces in. You must “push fit” each piece at a 45-degree angle and then hammer down the end to lock it together. The piece that you are locking together must be lined up correctly, which can be seen in the image below.
You must follow the correct process of fitting and the videos below show how to lay out the herringbone and where to start with the left- and right-handed pieces.
The video link here shows the correct way to layout and install. Halfway, you will see the initial layout where they started against the wall.
If you try and slide each piece in, you will never get the best fit. Always line up the ends perfectly and then push down and in.
To fully lock the herringbone, make sure you hammer the end in.
If you try and slide each piece in, you will never get the best fit. Always line up the ends perfectly and then push down and in.
To fully lock the herringbone, make sure you hammer the end in.
Make sure you use a plastic or nylon hammer to give sufficient “shock” to the ends, allowing you to fully lock each piece together. You must do this before going on to the next. If you feel it is not locking properly, then it is probably down to not fully push fitting the piece into the groove of the locking profile.
Make sure you use a plastic or nylon hammer to give sufficient “shock” to the ends, allowing you to fully lock each piece together. You must do this before going on to the next. If you feel it is not locking properly, then it is probably down to not fully push fitting the piece into the groove of the locking profile.
The most important thing to do when installing the herringbone is to use the plastic or nylon headed mallet to fully tap down the ends, which you can see in the short video INSTALLING IMPERVIA HERRINGBONE. This is the most crucial part of the installation to ensure everything is locked together. Do not hesitate to bang hard as you will not damage the surface.
Get in touch
INFO
Your Cart 
No items found